Monday, August 31, 2009

Amish Macaroni Salad

I love macaroni salad...well, there is one macaroni salad I always loved. It was at a local pizza place that is unfortunately closed and has been for quite a few years now. I know they bought it but I don't know where from. When I got the salad bar the only thing I put in it was macaroni salad and maybe a few spiced apple rings. Anyway, I've tried macaroni salad from different places and different brands. None have ever lived up to that pizza place. This one comes really close. I found it at Chocolate Moosey's blog

I've made it twice so far with a couple of changes. The first time I only used two hard boiled eggs because when I was chopping them, three looked like it would be way too many. I only used celery not green pepper and I cut back on the sugar. The second time I skipped the eggs completely, it didn't make a big difference but I think I prefer it with out the eggs. I also increased the amount of dressing by half it didn't make a big difference so I would stick with the original amount. Normally I have a problem with the sauce being absorbed into the pasta too much but I didn't have too much of a problem this time. That could be because I let the pasta cool completely or maybe because I rinsed the pasta with cool water. It did get a little thick but a couple of drops of milk stirred in before serving smoothed it back out.

Here's the recipe as found in Chocolate Moosey's blog

Amish Macaroni Salad
1/2 lb. elbow macaroni (I just guessed)
1/4 cup chopped celery or green pepper (or both)
1/4 cup grated carrots
2 Tbsp chopped white onion
3 hard-boiled eggs, chopped (yolks optional)
Paprika
1 cup mayo
2 Tbsp vinegar
1/4 cup sugar (you can cut back to 2 Tbsp if needed)
1 Tbsp yellow mustard

1. Cook macaroni as directed. Drain and let cool.
2. After the macaroni cools, mix with celery, green pepper, carrots, onion, and eggs.
3. In a small bowl, combine mayo, vinegar, sugar, and mustard. Fold into macaroni mixture. Sprinkle the top with paprika and stir a couple of times to mix it in. Cover and let chill at least 2 hours, although overnight is best.

Wednesday, August 26, 2009

Homemade Tomato Sauce

We've had an excess of tomatoes from the garden this year and with a fridge full of tomatoes I decided to try making tomato sauce before they went bad. I washed and diced the tomatoes and removed the seeds (well, most of them, I wasn't meticulous about it.) I put them in a large pot and ran my Braun handblender through it. You could use a regular blender or maybe a food processor. Then I simmered it on low for 4 or 5 hours, stirring occasionally, until it cooked down to the consistancy of canned tomato sauce. The first pass of the handblender left some chuncks so I did it again after it had cooked a little and it became much smoother. I let it cool some and packed it in freezer bags to freeze and use at a later date. All in all it was pretty easy but it did take awhile to remove the seeds so it might be easier to strain the seeds out after it has been cooked down.

above: just after it was processed with the handblender
below: after it was cooked down

Tuesday, August 11, 2009

Chicken Broccoli Noodle Bake


The recipe came from here at Recipezaar.

This was a nice recipe with a comfort food feel about it. Every thought it was okay except it needed to be saucier. It's something I might make again.
  1. Cook noodles in boiling, salted water until almost tender, drain.
  2. Mix soup and milk, add to noodles and season to taste with salt and pepper.
  3. In a 2 qt casserole, arrange 1/3 of the noodles, top with all of the broccoli.
  4. Top with 1/3 of the noodles, then with all of the chicken.
  5. Cover with remaining noodles.
  6. Mix butter with bread crumbs and sprinkle over the top.
  7. Bake uncovered at 350° until brown and bubbly, about 30 minutes.

Chicken Parmigiana With Homemade Pasta Sauce

I found the recipe here at recipezaar. I didn't care for the sauce it tasted overdone which I guess was my fault. I should have cooked it less than it called for. The recipe didn't say what to bake it at so I looked at some other recipes and cooked it at 350? (it was a while ago and I didn't write it down.) I cooked it the 40 min. that it said to but it was tough, I microwaved it for a couple of minutes the next day for lunch and it was a bit more tender so I think it should have been cooked longer in the oven.


I did not find this recipe worthy of making again. If you happen to want a frozen microwaved chicken parmigiana try Michael Angelo's it's the best! It's one of the few frozen dinner's I would actually say I like. I'm not getting paid to say it, it's really just that good.

Garlic Pepper Chicken

Tonight's supper was Garlic Pepper Chicken. It was a bit hot for some of us, including me but I don't eat a lot of spicy foods so take that into consideration if you make it. If you don't like spicy things, cut back on the cayenne pepper a little. Everyone thought it tasted great even those of us who couldn't take the heat. I will definitely be making this again. (just with a little less cayenne next time). I served it with white rice and a bag of stir fry mixed vegetables in House of Tsang classic stir fry sauce.


I found the recipe at Peacefulcooking's blog which I suggest checking out she has quite a few recipes that look great!

Recipe is copied directly from her blog.

Garlic Pepper Chicken
6 - boneless skinless chicken thighs (4 boneless skinless chicken breasts will work but it won't be as tender)
1 TBS garlic powder (one of the few times I use garlic powder)
1 tsp salt
1 tsp pepper
1/2 tsp cayenne or
red pepper
1/2 tsp onion powder
1/4 tsp paprika
1 TBS olive oil
1 TBS butter
1 cup chicken broth

Cut the chicken into tiny strips about the size of your pinkie finger. Mix together the dry ingredients and sprinkle over the chicken, mixing well so that all the chicken is evenly coated.

Heat up the butter and olive in a pan, making sure the pan gets nice and hot but don't brown your butter. You want the pan hot so that the chicken gets nicely browned when cooked. Add the chicken and brown, turning once.

Add the chicken broth and scrape up all the brown crunchies off the bottom of the pan. Turn the heat down and let the chicken broth reduce by about half. Serve over white rice. One of the best parts is when the rice absorbs some of those juices.

Edit: I didn't have onion powder so I skipped the salt and the onion powder and used an equal amount of onion salt instead.

Tuesday, August 4, 2009

Lime Chicken Tacos with homemade Tortillas

Tonight's dinner...


I found the chicken recipe at Taste Every Season
Here's the original recipe
Lime Chicken Tacos
from: BlogChef


Ingredients:

1 ½ lbs boneless skinless chicken breasts (cut into small pieces)
1/8 cup red wine vinegar
½ lime (juiced)
1 teaspoon sugar
½ teaspoon salt
½ teaspoon ground black pepper
2 green onions (chopped)
2 garlic cloves (minced)
1 teaspoon dried oregano
10 (6 inch) flour tortillas
1 tomato (diced)
¼ cup shredded lettuce
¼ cup Monterey jack cheese
¼ cup salsa
Sour cream (optional)

Make:

Step 1: Add a little oil to the pan and sauté chicken pieces in the pan for 20 minutes over medium-high heat.

Step 2: Mix together vinegar, lime juice, sugar, salt, pepper, green onions, garlic and oregano.

Step 3: Add the mixture to the pan and Simmer with chicken for another 10 minutes.

Step 4: Warm tortillas and add chicken mixture to each one evenly. Top with cheese, tomato, lettuce and salsa, sour cream.

I made a few changes to the recipe. I used 1 1/2 tbs of Realime juice instead of 1/2 a lime. I didn't have any green onion so I used about a third of a yellow onion diced finely. A red onion probably would have been good. I didn't have fresh garlic so I used a 1/2 tsp of garlic powder.

I thought the vinegar flavor was a bit strong but no one else noticed and it every one thought it was pretty good so I would make it again.

The tortilla recipe came from So Deliciously Good
Here's original recipe
1 1/2c warm water
1/4c canola oil
1/2 Tbsp salt
4 1/2-5c flour

Combine water, oil, and salt. Begin stirring in flour 1 cup at a time until your reach 4 cups. Add enough remaining flour to achieve a stiff but workable dough. Roll dough into balls. On a floured surface, roll out each ball into a 10-12" circle. Cook in a skillet sprayed with cooking spray or on a griddle for 1-2 minutes per side. Store in a plastic bag in the refrigerator. Makes about 10 tortillas.

I didn't change any of the ingredients except using vegetable oil instead of canola and I ran out of all purpose flour and had to use half a cup or so of bread flour in the dough and more for rolling them out.

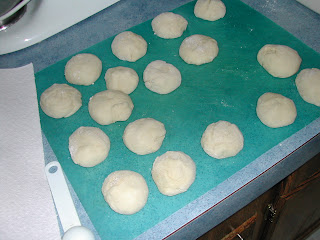
There was a few thing that I changed in the making of them. After you roll the dough into balls I would suggest covering them with a damp cloth so the outside doesn't dry out and get hard. The instructions say to spray the pan with cooking spray but when I tried that the tortillas got crisp like crackers. I found a dry pan worked much better. The excess flour browns in the bottom of the pan but it's not a problem to wipe it out with a damp cloth.

It's a lot quicker to buy a pack at the store but these were pretty good. In fact, I was told that these were better than store bought.

Now for some pictures....

The dough balls


Rolled out


in the pan


finished tortillas!